Showing posts with label Figures. Show all posts

Wednesday, December 10, 2025

NMRA AP Entries - Certificate Achieved!

I have embarked on the NMRA AP (Achievement Program). To date, I have received certificates for scenery, structures, author, volunteer, and cars. I was motivated to go this route because a couple of NJ Division Members indicated that I had most of the work done. It was just a matter of completing the paperwork. Here are the cars I recently had evaluated for the Equipment - Cars certificate.

This is Adams Express was scratch-built. The trucks are a unique feature known as a "swing truck". It was designed to handle tight curves. This model is based on two period photos. The one below the model was taken in 1863 or 1864 in the Nashville yards. The other is in Chattanooga. This latter photo was the basis for the walls, doors, and roof, which was tin.


This is a modified platform car kit by Mantua. In addition to the artillery, by Musket Miniatures, I added Alexander link & pin couplers, the device attached to the car which is known as a draw head.


Open top cattle car. This is scratch-built on a Mantua frame. The walls and doors are board-by-board construction.


Conductor's car. Scratch built from two images. These could also be called a Way car and were used primarily for the conductor

A BTS (Better Than Scratch) kit, flat cars were one of many different railroad cars used to transport military personnel. Worst situations was when wounded troops were transported in cattle cars, recently occupied by cattle.


Tuesday, September 6, 2022

Flat Figures by Brian Kammerer

Many, many months ago, I needed to scenic the area that increased in size as a result of opening up the aisle just south of Kennesaw Mtn. This area is at the top left corner between Kennesaw and where "Mill" is noted. The entire table of the Atlanta area is now parallel with the back wall and allows for a pleasurable 3' aisle.

I now had 3' feet of new real estate to scenic which I found artistically challenging and was a good thing. I had several ideas including a small farm, dirt road, double post and rail fencing. Mock up  structures were placed in the area. However, it all felt too busy.  Trains would be passing the Redoubt which has perspectives then a farm then mountain... So I just sat and pondered gazing into the bare benchtop. I would come back over a period of about 4-5 months. Interesting how the idea finally lands. I decided that I would create a deep perspective with distance. The backdrop / ridge line is foam core with a couple of layers of flocking. I would  need to show a 1000 yard or more distance from the ridge line to a full size (HO) foreground. 

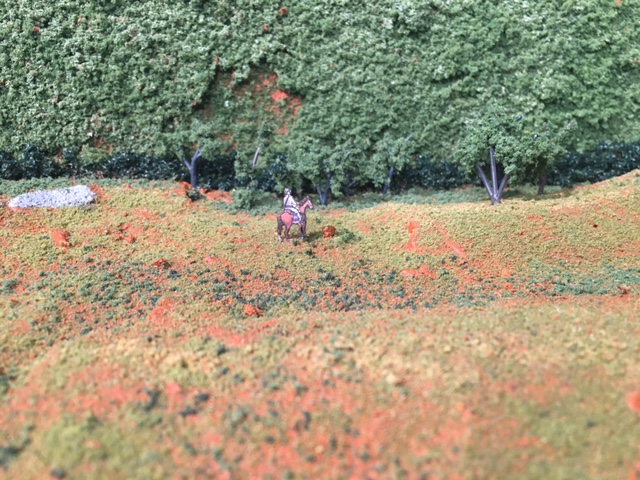
This photo below shows the first steps to bridging the distance. At the base of the ridge line is a dark tree line. The intent is to show a tree line closer to the viewer and enhance the perspective experience. There are two figures in the middle ground. This is what I call "concept measuring" to ascertain plausibility for the entire scene. The cluster of trees is meant to be a view-through element. Once painted and flocked, I want the viewer to peer through the trees to help distribute the perspective as they see the scouts. The stream, and of course the house car, are the foreground. The fun of creating this scenic element is assessing what to place between the stream and the ridge line to foster the sense of distance.


Close up of the above photo...


Even closer image below. The figure is another Brian Kammerer creation. His film "The Other Great Locomotive Chase" is populated with a plethora of flats. When I mentioned to him what I was doing he suggested flats. I had hoped he would. He graciously created a few sheets of infantry, cavalry and artillery figures. Everyone who has viewed this scene could not tell the scouts were flat.


One of the figure sheets Brain created is below. All I did was reduce the size then print a sheet. After cutting the figures I wanted, and adding a thin sheet of cardboard backing for rigidity, I simply glued a straight pin to the back. The bench is blue insulation foam, making installment of the figures very easy.  


I am getting ahead of my process.

While still in the imagination phase, and driving around on different days, one day as I was passing a field. I saw exactly what I was wanting to build. In the middle distance from the road there was a cluster of trees. The added component missing in my scene was the vegetation among these trees. Small, wild growing shrubs, bushes and some vines. Here is the nearly final touch, close up...


A more distant view...

I want to add more underbrush among the trees and in the open field. However, for the most part, I am quite satisfied with the results.

Wednesday, February 3, 2021

Latest Images of the Atlanta Rolling Mill

Amazing in that five months have passed, I have had the least amount of work and NO POSTS! I decided to at the least share a few photos of the current state of the mill. 

The primary source for the interior detailing comes from this painting by Menzel:

One of the first interior elements were 3D printed by my good friend, and ACWRR member, Gerry Dykstra. He fashioned rollers that are a visual feature for this model.

This is one of many images Gerry sent to me and was the basis for his 3D printed roles:

These are the results of his printer. I add the bracing, stanchions and drive shafts all from brass rod and tubing.


Another massive machine was the steam hammer. Here is another image, compliments to Gerry's research, that was the template for the model I scratch built.

After scrapping the first attempt, due to oversize measuring on my part, this is the final completed model. The horizontal and vertical rods are the truss rods that kept the walls together.

Constructing the Bow Trusses were a tedious process. Here are two photos...


Adding additional details including figures, this is it's current state...
If you look closely, I fabricated aprons on several workers tending the rollers. These were formed with very old toothpaste tubes that used to made from metal. Initially I was using these to create flags, about 40 years ago. 
I attached BTS tongs to figures that just happened to have their arms in the right position. Although I have altered figures arms, etc., I prefer to find figures that are close to or happen to have just the right position. These are a combination of Musket Miniatures, Prieser and Model Power. 


Sunday, September 8, 2019

KENNESAW ENTRENCHMENTS

Kennesaw Mountain was one of the more fortified areas protecting northern approaches to Atlanta as shown is these tow period photos and the Don Troiani painting "Thunder on Little Kennesaw" 
My dear friend DC Cebula, who has been an ongoing contributor to the W&A, is depicting a scene combing these three images. As recently as August 30, here are images of his work. As you can see a significant element to completion is adding the dense foliage.

Thursday, December 29, 2016

Passenger Car - Adding Passengers

This post is a follow up from the previous by taking the 'Passenger Car Detailing' to its next step. The ease of this process is that unless the car is lit, passengers only require the slightest of color. The original cars come with a card showing silhouettes of passengers. I prefer creating a 3D quality to enhance the models... and, I just may install lights in the cars down the line. 
At first I thought I would need to have figures be of the period. However, after a test using 20th century folk I could not tell the difference. This contributes to the 'ease factor'. I have many Prieser figures left over for other kits where a few choice positions were transformed into period-looking people. All those leftover seated figures are now being conscripted for the cars! 
I prime them while on the sprue. I then use the Pic-n-Stick Q-tip looking tool to hold as I paint them if not on a sprue. These are fabulous. One box has about 30 and they can be reused many times. 
As you see in this photo below, there are 3-4 basic colors. No detail painting as mentioned since most of the view will be silhouette-ish. 
 
Next is to attach the passengers to their seats. These 'Pikestuff' seats can be found at train shows, as well as seated passengers, versus buying retail. I find most hobbyists have leftover seated people that they want to unload. 
You'll notice below I have the benches spaced because I don't want to waste seats and I want to position them randomly. The piece of styrene under the seat base is so the bench is even with the weight that runs through the car center and keeps the bench level. By the way, the lady in front came painted. Another find at a show.
Next is to add louvers. As I mentioned in the prior post, my friend Brian Kammerrer, who also painted the backdrops, sent me this sheet based on my description. 
 I cut various lengths and install with Aileen's Tacky Glue.
 This is a larger section to cover three windows.
And the final step is to enclose the passengers, then send them off to their next adventure... as am I!