Wednesday, August 25, 2021

Out of Town Guests

 We were privileged to have a couple of members from our Civil War RRs group visit the W&A, Roger Rossi from TX and Dan Free from NYC. Left to right... Dave Eberhardt, friend since high school days whose layout was my first experience building layout models; Christopher Eldridge who has scratch built several structures on the W&A. It helps that in addition to being an incredible model builder he is also a master carpenter; Dan Free who wrote and published his book  on Japanese RR's; Frank Marticelli from my local model railroad club, and Roger.

Here is the cover of Dan's book. It is a most remarkable work of research!


I have been busy working on a couple of locomotives installing the Tsunami 2 1100 decoder as well as working on my NMRA Achievement Program for structures. Although a fair amount of paperwork, it has helped me become more thoughtful and organized on my approach to building. It has also been a fabulous time having a few NMRA Division members visit as judges. 
 

Saturday, March 6, 2021

Adams Express Group Build Project

 About one month ago, Bernie Kempinski posted a suggestion / challenge for a group build of a box / freight car. The purpose is to generate activity and motivation for those who have wanted or perhaps have stalled on a project. It also can inform members and viewers as to the possibilities to increase your railroad fleet. I chose to scratch build the Adams Express car. As far as we know, there are only two ACW era photos. Interesting in that there are three different types reveled in these images shown below...

This first image, taken in Nashville, has long side openings and an exterior door. The truck side frames are unique in that they are braced with two vertical beams to accommodate heavy loads. One can assume that the color was on the lighter side since the lettering and numbers are dark. A cool modeling detail is the calk marks on the sides. Although they could be considered graffiti today, these were either instructions or notations for the handlers.


This next image shows two Adams cars photographed in Chattanooga, circa 1864...

On the left, a distinct difference from the above is that the door runs on the inside and has a curved roof versus peaked. And seeing white lettering, most likely the color is quite dark. Looking at a photo I took at the Sacramento Museum, it could be a bluish green, seen below this photo.

Back to the Nashville photo, the Adams car to the right has other differences which include a shorter height, a boarded up window and what appears to be an even lighter color with dark lettering.  

Here is a sequence of photos of my partially completed version of the car in the Chattanooga photo...

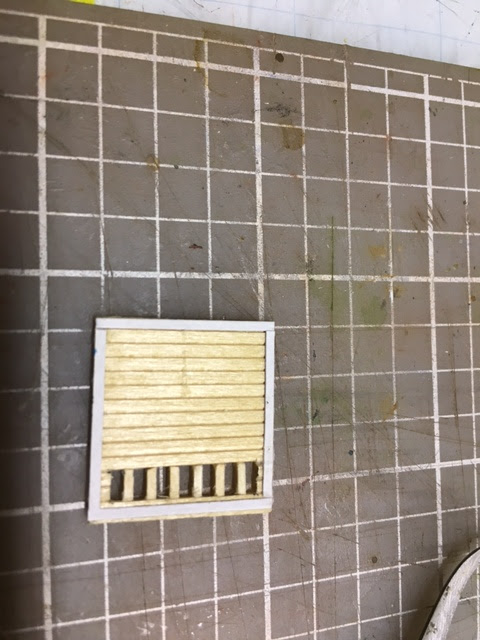
Siding is Northwestern scale lumber, 1/8" scribed siding, but the planks are too wide. I would use the more prototypical 1/16" for others. The roof is card stock and scored to illustrate a metal roof. I will add Panamint HOT82sACW 3D printed trucks and InterMountain metal wheels. I used metal crate castings for weights and have one door open to see in. Look close and there is a waybill attached to one of the crates. On the other end is a 1/4 oz. weight to bring the total weight to about 46 grams. Alexander link and pin couplers are also attached. Grab irons are Detail West .019 brass wire. Grandt Line  #5101 nut/bolt castings also add to the detail. Turnbuckles are by Tichy. Queen posts I believe are Grandt Line. I found these in a drawer, to my joyful surprise, but were loose so the manufacturer is a guess. Lastly will be to create decals or cut individual letters... oh boy.


Wednesday, February 3, 2021

Latest Images of the Atlanta Rolling Mill

Amazing in that five months have passed, I have had the least amount of work and NO POSTS! I decided to at the least share a few photos of the current state of the mill. 

The primary source for the interior detailing comes from this painting by Menzel:

One of the first interior elements were 3D printed by my good friend, and ACWRR member, Gerry Dykstra. He fashioned rollers that are a visual feature for this model.

This is one of many images Gerry sent to me and was the basis for his 3D printed roles:

These are the results of his printer. I add the bracing, stanchions and drive shafts all from brass rod and tubing.


Another massive machine was the steam hammer. Here is another image, compliments to Gerry's research, that was the template for the model I scratch built.

After scrapping the first attempt, due to oversize measuring on my part, this is the final completed model. The horizontal and vertical rods are the truss rods that kept the walls together.

Constructing the Bow Trusses were a tedious process. Here are two photos...


Adding additional details including figures, this is it's current state...
If you look closely, I fabricated aprons on several workers tending the rollers. These were formed with very old toothpaste tubes that used to made from metal. Initially I was using these to create flags, about 40 years ago. 
I attached BTS tongs to figures that just happened to have their arms in the right position. Although I have altered figures arms, etc., I prefer to find figures that are close to or happen to have just the right position. These are a combination of Musket Miniatures, Prieser and Model Power.