You most likely recall seeing some of Nick Kane's modeling craftsmanship on prior posts. This is the most recent video short that Nick sent. If you are seeing this locomotive for the first time, other than the wheels and the electrical components, it is completely scratch-built! At some point, I will post some of the photos of Nick's build, which is known as the Robinson. He is building a model railroad depicting the Sacramento Valley RR. More to come, stay tuned!
Showing posts with label Locomotives. Show all posts
Showing posts with label Locomotives. Show all posts
Thursday, May 7, 2026


Thursday, February 5, 2026
Nick Kane's Scratch Built 4-4-0's
If you have been following Nick Kane's new layout build of the Sacramento Valley, circa 1860, here are two photos of his locomotives. Left is one modeled after the Garrison loco. On the right is the Robinson. 90+% of these gems are SCRATCH BUILT folks!!


I will be posting more photos and hopefully videos of Nick's layout development and his livery of cars.
Monday, December 29, 2025
Prototype to Model
Prototype to Model, also known as PtoM, is a relatively new section in Model Railroader magazine. Editor Eric White publishes photos of models that replicate an actual prototype image. When my dear friend Andy submitted this photo, his intention was for the Trackside Photos section of the magazine. However, Eric responded, informing us of this new segment in the magazine called PtoM.
The first photo is by George Barnard, the photographer who accompanied Sherman during his Atlanta Campaign, showing the Atlanta yards in1864, after the Union capture of the city. A few weeks later, the Car Shed, or passenger station, along with all rail facilities were destroyed by the Union forces.

The photo below shows what Andy did to blend my layout with this image. Can you tell which aspects are modeled?

Wednesday, April 19, 2023
Mantua General 4-4-0 Rebuild Part 1
I have rebuilt about 10 of these Mantua Generals. But since Soundtraxx came out with the TS2 1100, I have converted a few to include these beauties. The sound varieties are are superior to their Economi and Micro sound decoders, which I had in several of my locos. Photo below is the General as Mantua manufactured it. I believe the former owner colored the stack and pilot as these were originally black, or if from a kit it would be bare metal. Note the drive shaft. This too was modified as I needed to change the motor to fit the tender along with a speaker, "super" capcitor and the sound decoder.

Where to start?1?1?1 - Contemplate your sequence of moves. It is a bit of a chess match. And as with chess, there are multiple moves. For this build I first chose all the detail parts I wanted to add. Here are two photos showing these.
Top photo, row left to right: tender steps, water valves, water tank hatch, stack.
Bottom row left to right: tender brake beams, firewood split from local shrub, short and long handrail stanchions. Later I'll show how these were configured.

Top row, left to right: valve steam rocker arms, whistle, bell, horizontal pilot.
Bottom row left to right: boiler stanchions, steam chest lubricators, double link coupler pocket, long tool box for rear of tender.


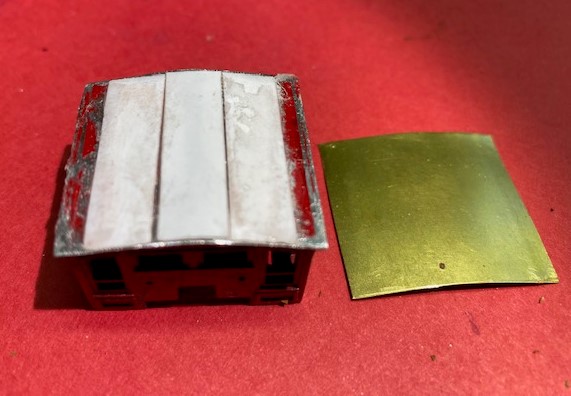
I made notes, both mental and written, as to what I wanted to build. First was the cab roof. Through our civil war railroads groups.io, we learned that cab roofs were not all peaked as with the Mantua model. There were arched as well. My good friend Lebron made one and I adapted his approach. First, file off the peak, then using a thin sheet of brass, it is shaped into an arch. Shims were inserted to support the new roof.

Now to assemble the electrical components. Most difficult to find these days is a strong motor that fits and can accommodate other parts. Here I have a Swiss Micron motor, 13mm x 20mm. The sound decoder, cube speaker and current keeper are by Soundtraxx. Respectfully TS2 1100, 810154 cube and 810140 "super capacitor". I also use TCS KA2 Keep Alives in some locos. Both of these have worked fabulously! Rarely is there a stall or stop over a switch.


This next image shows the above components installed into the tender. The pointer is indicating the mini plug connecting the hot wire from the decoder to right side drivers. The ground wire is not visible but it's been attached to a screw that was tapped into the tender from. This connects the left side of the tender trucks which also have brass wire wipers soldered to the truck and bent slightly to touch the tender wheels on the left side. The white wire is connected to another mini plug for the hot wire coming from the headlamp.

Here you can see how the headlamp wires are connected. The ground wire is held in place with the screw that holds the steam dome in place. Duck tape keeps the wires secured to avoid floating into the drive mechanism.
.jpg)
Here you can see the electrical components, in particular the motor. These unfortunately have significantly increased in price, only available direct from Switzerland. At $90 plus a $16 shipping chang made these impractical to continue using. I am now on the hunt for a successor. Also in this photo you see a few other aspects of the install. One is how the ground wire from decoder is screwed into the tender frame. ANother is the mini plugs. You just cut away the black plastic with cutters. They are then soldered to their respective wire. Lastly is the use of scotch tape to hold it all together, seen also in a previous photo.

The painting of course started earlier. I primed with a Rustoleum paint. The Russia Iron color I found in my collection of Model Power paints. Russia Iron can be a variety of colors. However, this version, from my research, is pretty spot on.


I predrill all the holes for the detail parts either prior to painting and most certainly prior to adding decals. Here's two photos of cab grab irons.


The decals are by the master, John Ott. He is a medical illustrator by trade. He also creates remarkable lithographs of 19th century locomotives. http://www.ottgalleries.com
Here are the decals he recently did for me for this build. Impressive no?

I first cut the curved end. The other cuts being square are made after as the hold the decal in place for the free form cut of the curve.
The area to apply decals must be painted white for the decals to show up. I use Vajello white. I tried the gloss white but it was too clumpy. ALthough you can see small ridges in the paint, these are unnoticeable after decal is applied. Micro Scale decal products are quite reliable.


Once applied, I wick most of the water away in some cases. right photo. But the water helps to loosen the decal to position it, left photo.


In some cases the decal is a little short. Color matching is ket to cover the white area at tender bottom. Two Polly S colors worked!

Main components are painted and ready to be assembled. Weight is a most important element for these locos. Cabs come with a full weight. However, I like to add the engineer. Using a very slow process of cutting out that corner with a hack saw allows for the figure.

Next time I will show installation of the other detail parts and other nuances to rebuild a Mantua 4-4-0.
Friday, October 14, 2022
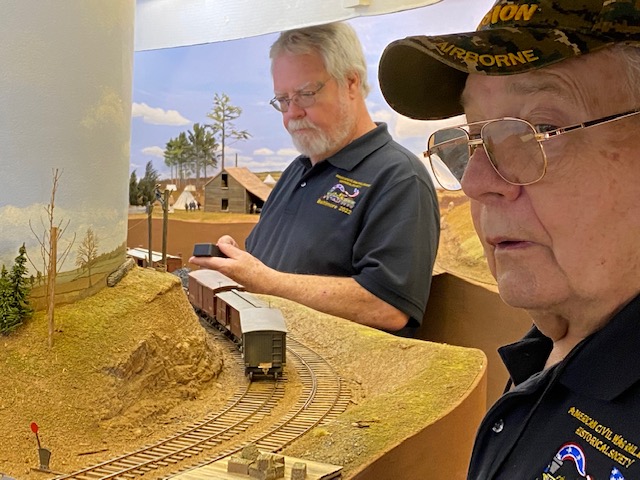
Annual Civil War RR's Meet in Baltimore
We are known as the American Civil War Rail Roads Historical Society, created in 2003. For many years we would rendezvous at a location with ACW RR history. We've been to City Point, Chattanooga, Atlanta, Memphis (2x), Alexandria, Savannah, Harper's Ferry, Gettysburg, Hanover, now Baltimore, for a second time. Prior Baltimore trip was 2012. The trip covers about 3 days, Thursday evening through Sunday morning. Typical trips include site visits, clinics, speaker(s) and ideally operations sessions at a local model railroad. Here are some photos of our trip. Hope you enjoy the ride...
This was at the B&O museum in Ellicott (pronounced Elikit) City. Our guide was incredibly knowledgeable. Being of Irish decent, he was very familiar with the B&O as one of his ancestors was a railman.
Left to right, Charlie Taylor who models the M&C, O scale, and lives in Tennessee. DC Cebula, living in Delaware, models an HO freelance layout, the Del Central. The back of John Bopp who models in HO scale and is an historian of locomotives.

Here we all are in front of the William Mason 4-4-0 in the B&O RR Museum Roundhouse. This loco was leased by Disney for the Great Locomotive Chase and used as the Texas. Jeffrey Hunter, Slim Pickens and other actors rode this baby!
Left to right, Charlie, Ken Bruns, Paul Ciesmelewski, DC, myself, John Bopp, David Bjorkman, Phil Ruehl and Marty Vaughn.

I was able to get a peek into the cab. Later found out that this is verboten!


Until next time... Happy Rails!
Friday, June 3, 2022
Test run with a Soundtraxx Current Keeper
Locomotives running smooth is what truly matters. Otherwise I have a wonderful diorama. But that is NOT the goal. Here are two video shorts showing the Dr Thompson, a converted and detailed Mantua General, on a test run. My big difficulty was getting them to consistently run through turnouts. So far so good!
Saturday, September 24, 2016
CATOOSA - Mantua Rebuild
I have embarked on the next addition to the W&A stable of locomotives, the Catoosa. She was a Norris built locomotive, same manufacturer as the Yonah. As always, a key reference for the Mantua General alterations is Al Mueller's manual...


 I use a motor from a fella named "Motorman" who restores and rebuilds a wide variety of motors and can be found on the internet. He operates via eBay usually. This motor is a Swiss Maxon 13 mm 7 pole coreless motor-High torque (150731330992). They run about $45. My locos are able to pull 12-18 car trains which is quite a feat given that the Mantua General's are not known for their pulling power. Of course I weigh my cars below the NMRA standard to about 30 grams.

One of the more prominent elements to his rebuild is his idea on making room in the tender for a new motor, decoder, speaker and capacitor. Once the tender top is removed, grinding away some of the frame is needed to accommodate these parts. And since the original model comes with a plastic wood load, that is not acceptable for a fine scale model replication. Here's a page from Al's manual on preparing the form for the wood load.

Now here's the result of my attempt to replicate his instruction. You can see that I added a brass plate and water tank cap; the cap is from Precision Scale.

These next two photos show the tender interior exposed. By being able to remove the wood load there is easier access to the motor section without needing to remove the entire tender. It also allows for more ventilation. The black tip coming out of the tender front is a drive shaft cup from NWSL. The drive shaft mechanism is another redesign element also offered in Al's manual.


The decoder is a Tsunami Micro. But these have been discontinued. Their replacement decoder is called Econami. Al has installed one or two and vouches for their reliability and easier programming as well as installation; these are slightly smaller believe it or not.
Tuesday, September 29, 2015
ACWRRHS Spetember 2015 Annual Meet

Below is Bill Aldrich, a volunteer guide and authority on the Gettysburg train station and an extraordinary model builder. Here he is showing us his G scale model of the 4-4-0 Conewago which pulled the car carrying then president Lincoln to Gettysburg for the consecration of the national cemetery where he read the famous Gettysburg Address. Bill scratch built the 4-4-0 from the actual plans... and I do mean scratch including working levers, double cross head guides and an engineer who he fashioned from a photo of the actual engineer.


Once there, click on Photos, then Albums and click open 2015 MEET. There are other photos showing N scale modules built by Joel Salmons and Paul Dobbs as well as beautiful G scale models of flat cars hauling artillery most of which was scratch built by Dennis Lenz. Here is one shot of him with Gerry. That's Paul, red shirt, and Joel in the background.

Monday, November 10, 2014
NMRA 2015 Calendar Photo
It's a grand day as D.C. Cebula has had a photo of the railroad featured in the 2015 NMRA Model Railroad calendar.
 American Civil War model railroads are a very infrequent feature in all railroad model magazines primarily because so few people do model this era. A primary reason being the lack of quality locomotives and for any manufacturers, the challenge of installing sound. As noted in the caption, a Micro-Tsunami sound decoder has been installed in this 4-4-0 which is all hand done by the modeller; in this case myself. The procedure takes about 20 plus hours including altering the locomotive to fit the prototypical appearance of the time.
So congratulations to D.C. who has also been a strong contributor to the construction and superb modeling of this railroad. There is a label devoted to his skillful creations if you would like to see more of his work.
So congratulations to D.C. who has also been a strong contributor to the construction and superb modeling of this railroad. There is a label devoted to his skillful creations if you would like to see more of his work.
Saturday, June 14, 2014
Dr. Thompson
As the W&A North Branch continues to evolve, we are at the point where we now have locos with good to excellent running Mantua 4-4-0 locos. The Dr Thompson, shown here, is one of three recently retooled Mantua Generals, the other two being the Dispatch and the General, both of the W&A RR at the time. Al Mueller's manual, "Mantua General Rebuild" is a key resource for anyone interested in refining this Mantua locomotive. Although as many as 20 to 30 hours are invested, depending on the level of detail one wished to add, the exceptional smooth running is certainly worth the time. A product that I have found extremely useful is CRC, an automotive contact cleaner. I was amazed at the amount of dirt removed from both the rails and loco drivers. Clean is paramount for these locos, as well as the retooling noted in Al's manual. We hope you enjoy the ride. Comments are encouraged so we know how it appeals to the viewer.
Saturday, November 9, 2013
Al Mueller's Orange & Alexandria R.R.
October 1 I visited Al Mueller at his home in WI, also the home of his HO scale Orange & Alexandria R.R., depicting 1861-62 Virginia. He plans to run both Union and Confederate operations and has the fleet of locos to do so, 10 to be specific and nearly all Mantua Generals that have been re-motored. Two of these are featured in a video posted a few days ago.
 |
Al is fortunate to have a huge and nicely finished basement. In the background is a layout he built but depicting the 1950's. He has since seen the light and now models a most colorful era for locomotives. He has posted many photos of his locos on our yahoo sight Civil_War_RRs@yahoogroups.com.
|

In his past he had a passion for rebuilding cars. Although slightly distinguishable, the black and white photo on his wall to the right of his cloud backdrop is him next to one of his autos.

I had to show you the scope of his "workshop". Every tool a modeler would not mind having or at least access. Thanks Al!


Tuesday, October 29, 2013
The Orange & Alexandria R. R. A Visit to Al Muller's Layout
A few weeks ago I had the pleasure to spend two and a half days learning from one of the masters. Al wrote the MANTUA GENERAL REBUILD manual for converting the basic General into one that runs with precision quality and to be extraordinarily detailed. Of course I brought along several of my 4-4-0 Generals to get Al's "laying on of hands" and came home with more than I could hope for as we fine tuned, machined and took my work to the next level. You will be seeing these in action in a future post... I hope! For now, here are 2 videos I shot while visiting Al's O&A.
Friday, October 25, 2013
W&A RR North Branch - Video.
This video features LeBron's Texas after a complete fabrication, everything from a new boiler to smoke stack and a variety of detailing including the addition of sound. We were testing pulling ability. During the war trains up to 23 cars were hitched to a loco, in some cases double headed. Here the General is pulling 11 cars. You also get to see and hear us in the background during a rare working session when LeBron, Christopher, DC and our videographer Andy could all be here, a rare treat. Toward the end you have a view into the troubling moment when a short occurs. This happens when all was well just the night before when a train had run that section without a hitch. Such as it is with model railroading. Always the adventure, fun and the shear enjoyment when the crew's in town!
Tuesday, March 6, 2012
The General has a Voice
Sound on the Western & Atlantic
This is a maiden run by LeBron's Mantua General. He has completely retooled this 4-4-0 including scratch building the boiler from styrene. As you will shortly experience, if you have not already played the video, LeBron is one of two people that I know of who have successfully installed a Tsunami sound decoder in a completed, fully functioning model. Sound takes the experience to a very enjoyable level. The rolling stock include repainted Mantua house cars, IHC cattle cars, and two of my first scratch built cattle cars. The latter two are based on drawings in the April 1969 issue of Model Railroader, "Cars of the 1860's". The bridge is a Howe Truss modeled after photos of the type used on the W&A, most notably over the Tennessee River.
Monday, August 3, 2009
Welcome to the Western & Atlantic R.R., North Branch

History
Greetings, and welcome to an HO scale model of the Western & Atlantic Railroad. The W&A was a Georgia state owned and operated line between Chattanooga TN and Atlanta. Both cities were major rail hubs at opposite ends of a 136 mile route. It was one of the most organized and well run rail operations in the South. A particular incident occurred along the line on April 12, 1862. It would forever be known as The Great Locomotive Chase. About 22 Union soldiers dressed as civilians stole a train, the General, and several box cars with the intent to burn bridges as they headed back north. However, they were all captured. In the end these soldiers were the first recipients of the first Congressional Medals of Honor, some posthumously.
The Western & Atlantic RR was a key supply line for several Confederate Armies, especially the Army of Tennessee. Summer of 1863, Union forces led by a General Rosecrans were pushing south toward Chattanooga intending to capture the city, its rail line and destroy the Rebel army. Rosecrans was eventually replaced by a General Tecumseh Sherman who was able to utilize the railroad as his supply line while he campaigned along the line heading for Atlanta. My version of the W&A is set in August 1863. General Rosecrans and the Union forces are just across the Tennessee River above Chattanooga beginning a siege. Trains have been running south for a couple of weeks removing important equipment out of the reach of the Yankee "invaders" as a precaution. The Rebel forces have been unable to halt their advance and civilian confidence has been waning. At this same time trains are also helping deploy Confederate forces into Georgia from Mississippi and Virginia to turn back Rosecrans and the Union army.
Layout Overview
The idea for a Civil War layout had begun in the 1960's with a friend, Dave Eberhardt, also a civil war enthusiast who had begun his own layout but of the Penn Central. The work on this layout started about 1999 when I decided to purchase a house, one requirement being a space for such a project. Fortunately, and eventually, my wife realized this intention of mine was for real and not a Christmas time endeavor around the tree.
Many years of research in places such as the Atlanta Historical Society and Georgia State Archives led me to very influencial people. Retired Army Colonel James Bogle was one such person. He was not only an authority on the Western & Atlantic, he was also good friends with a fella named Wilbur Kurtz, consultant to movies like "Gone With The Wind" and Disney's "Great Locomotive Chase". Mr. Kurtz, who I unfortunately did not meet, was married to the daughter of Bill Fuller, conductor on the train being pulled by the locomotive General during the great chase. In the archives there are letter exchanges between Mr. Kurtz and his father-in-law about topics such as length of house cars, the type of brake wheels and the motherload... mention of the color, slate blue.
Colonel Bogle also connected me with a model railroader from Michigan, Ken Pruitt. Ken had modeled the W&A and the Chase in particular. He is a terrific modeler who built his layout in the 1980's and many of the structures on my railroad are Ken's which were purchased along with most of his equipment. He unfortunately needed the space for other purposes so the timing of meeting Ken could not have been more perfect. He helped launch my layout.
The Blog
Entries are made on occasion versus every few days, weekly or even every few weeks. The intent has several objectives:
- A journal to capture highlights of the construction and operating.
- Hopefully provide a few insights, ideas, lessons learned and enjoyment for other modelers and interested parties.
- A way of acknowledging my friends who have made terrific contributions to every aspect of the layout.
We hope you enjoy the ride.
Subscribe to:
Posts (Atom)