Saturday, December 19, 2015

M&C RR Update

I know, I know, not much of the W&A recently. However, I can not pass up the opportunity to show the latest progress on Charlie Taylor's O scale M&C. Below is one of two photo updates showing the Memphis Depot.

The extraordinary aspect of this and the next photo of the Huntsville Roundhouse is that I initially thought these were laser cut as are several of the M&C structures. Actually these are scratch built. Charlie Curro is the master craftsman who has done many of the M&C buildings. The doorway detail is truly spectacular.
This one below is the Huntsville Roundhouse, also scratch built. Please note that the roof is metal!
Next post will be a tip for discarded car weights and recent photos of work on my W&A Roundhouse.

Sunday, October 18, 2015

Crew Shots

A view into the past of the different contributors to the layout..., about 2005 or 2006.
Below, Brian Kammerer, Rhett Tyler, yours truly and D.C. Cebula.
Here's D.C. from about 2005 or 2006 lining up the backdrop frame behind Big Shanty. D.C. has done almost every aspect of construction. Next, I hope, he will take on my least favorite area... ELECTRICAL!
Brian, circa 2007, painting one of the three panel backdrops to Atlanta.
The crew who have made this layout what it is today. Each person is a master in their own craft, humbly speaking of course.
Myself, Brian from Connecticut, LeBron Matthews from Georgia, D.C. from Delaware and Christopher Eldridge from the Philadelphia area who built three iconic structures, the blockhouse, Lee and Gordon's Mills and the Barnsely Mansion and gardens.

Wednesday, October 7, 2015

Memphis & Charleston RR - NEW PHOTOS!

Just received these photos from Charlie...
If this is your first visit, these depict an O scale model railroad by Charlie Taylor and his crew. He and his railroad live in the Memphis area. 
Chattanooga Car Shed  
W&A Depot
 
Chattanooga Blockhouse
 Trestle over Running Water Creek Bridgeport, AL
 On the M&C crossing the TN River Bridgeport
Leaving Chattanooga for Memphis
 Outside of Corinth, MI
 Stevenson, AL

 Huntsville Turntable
 The Train Room

Charlie Taylor and crew have been pounding rail and laying bricks as they continue their work on the Memphis and Charleston RR, figuratively of course. As some of you may know, Charlie's line is O scale and they have been building since 2010. His roundhouse stable and rolling stock inventory includes equipment from SMR and BTS models. He, on rare occasion, sends me a text with a photo or two of progress. One of his key collaborators is Carlie Curro who builds structures, primarily. There is also nephew Will Shirey who is the backdrop artist. 
Here are a few of the latest images I received from Charlie, one as recent as this week.

This is the famous Crutchfield House, the hotel a short distance from the Car Shed. It was here that then President Jeff Davis gave a speech to a crowd off the balcony to the left of this view in 1861, maybe '62. Nearly all of the structures are laser cut. By the way, the Car Shed on left with curved roof... its about 5' long!
Charlie's layout is housed on the second floor of his 3 car garage, the 2nd floor built specifically in mind for this magnificent O scale model railroad. The M&C line includes significant stations in Memphis, Corinth, Huntsville, Stevenson, Shellmound/Nickajack, and Chattanooga with additional water stops in Germantown, Bridgeport and Whiteside.
He uses Fast Tracks turnouts as they have mastered turnout forms and templates which expedite the laying of track.
Above is a model of the cave where the dirt was used to make  saltpeter for the making of gunpowder. This was an area in Tennessee known as Nickajack as was the largest single domestic source of saltpeter for the Confederacy. I suggest clicking on the image for a larger view. This is not a painting but a 3D model, and this cave is quite huge; O scale!
Below one of SMR's 4-4-0's with a few of their freight cars, passing at the foot of Lookout Mountain.

Tuesday, September 29, 2015

ACWRRHS Spetember 2015 Annual Meet

The York 4-4-0 on the return to New Freedom from Hanover Junction. This was one of our highlights last weekend as we ventured into PA for our annual meet. From left to right, Teresa and Gerry Dykstra, Alan Hart and Mark Richardson, first timers to our meets, Al and Barb Mueller and Janet, behind Barbara, and Joel Salmons. This train operates out of the Steam Into History museum in New Freedom. On this run it was meant for railfanning picture taking. Unfortunately for us we did not know that this event was planned for night photos. All we had were iPhones and less-than high end cameras. Fortunately one of the pros was kind enough to take this shot. 
Below is Bill Aldrich, a volunteer guide and authority on the Gettysburg train station and an extraordinary model builder. Here he is showing us his G scale model of the 4-4-0 Conewago which pulled the car carrying then president Lincoln to Gettysburg for the consecration of the national cemetery where he read the famous Gettysburg Address. Bill scratch built the 4-4-0 from the actual plans... and I do mean scratch including working levers, double cross head guides and an engineer who he fashioned from a photo of the actual engineer.

 Here is a closer view of his craftsmanship.
 And another. Bill also scratch built the passenger car.
And here is one with the engineer.
He also built a G scale model of the Gettysburg station and an HO model of the station area including various structures and track. These are located in the train station. Bill also built an N scale model of the entire town which is housed in the Wills house, the building where Lincoln stayed during his trip. These and many other photos of our trip can be viewed on our site: https://groups.yahoo.com/neo/groups/Civil_War_RRs
Once there, click on Photos, then Albums and click open 2015 MEET. There are other photos showing N scale modules built by Joel Salmons and Paul Dobbs as well as beautiful G scale models of flat cars hauling artillery  most of which was scratch built by Dennis Lenz. Here is one shot of him with Gerry. That's Paul, red shirt, and Joel in the background.
 

Saturday, September 19, 2015

'Resources for Old-Time HO Modelers'

We are a small niche in the world of model railroading. And when I find a person, site, group or blog that is also interested in, if not devoted to, period/Old Time railroading I do what I can to promote their existence. Hopefully this translates into greater visibility and at best connections and trade craft sharing as well as product purchases.

Here is one such site by John Ott. I have not had the pleasure to meet John, yet, but noticed he or someone from his site visited my W&A blog. I usually check out those who are checking out us and found John's site to be quite uplifting in that he does promote manufacturers, vendors and fellow modelers. Listed are everything from figures to kits; some of whom many of us know such as BTS and Bernie Kempinski's USMRR. 

I encourage you to visit his site, http://www.ottgallery.com/FavoriteLinks.html which is also listed with other notable sites and clubs on the right side of our blog page.

Saturday, July 18, 2015

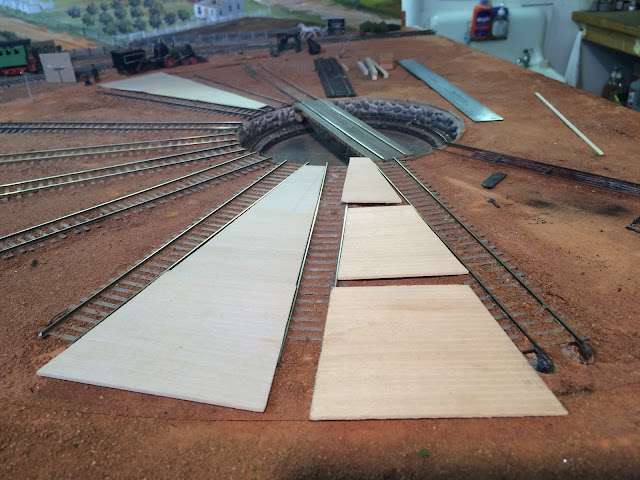
ROUNDHOUSE FLOORING PART II

Many moons ago I began planning and tracing the spaces between the roundhouse bay tracks. Research plausibly indicates that roundhouses did have wooden flooring. I chose this Northeastern 1/8" wide scribed siding. With a few more sections to cut and install, I am also adding a loco pit where workers clean loco undersides. Clearly more to do yet filling in end gaps like the one below. Next big project here is how to add lighting, most likely on beams above the bays.            


Tuesday, June 30, 2015

Turntable Discussions, Episode 2 with Dr Lebron Matthews


In this latest episode, I interview Dr. Lebron Mathews who lives in Midland GA. Although a doctor of theology and retired as pastor, Lebron is extremely well educated in the American Civil War, in particular units from GA and of course, the Western & Atlantic RR. He shares his early experiences with model trains, his time as a re-enactor and several aspects of modeling his own version of the W&A. Photos of LeBron's layout are posted in the photos section of our  Civil_War_RR@yahoogroups.com.

 I want to thank David Guardia for shooting this episode. David is currently working on his degree in computer sciences and does vidiography as an avocation.

Thursday, June 4, 2015

Roundhouse Interior Phase 1

This year I have been researching for the interior of the roundhouse. Starting with any roundhouse close to this period there is very, very little that I have been able to discover. Finally I found the site for the Roundhouse Museum in Savannah GA. First place to begin an interior is with the flooring. After speaking with a curator there, as well as other historians both architectural and RR oriented, wood planks appear to have been the preferred choice. Both timber and labor were quite abundant then and although cement was available at the time, there is more evidence for the use of wood as flooring. 

I decided to go with a 10x4" plank although they may have been 8" or 10x10" beams. For the purpose of fitting these between the rails and the roundhouse bays I went with planking. Using Northwest lumber I chose scribed siding versus laying each plank separately. I did however consider individual planks for the look, but I quickly went for expedience and chose sheets instead.
I started with tracing paper to get the exact dimension as shown above. One issue I discovered is that my geometry skills are clearly not up to par. Each section between the tracks is slightly different so each bay will need to have its own measurement.  
Tracing paper is mailable enough versus cardboard and I could easily work the paper and make the markings for an easier template. Next was to transfer this onto the sheet of scribed siding, make the cuts, test the placement and sand or trim where needed.
The curved pencil line is the interior wall marking. This way I know where to trim the flooring. As you can see these floors are large puzzle pieces since the sheets are being cut somewhat perpendicular to the rails as my research, although limited, had revealed.
Stay tuned as I ran out of the scribed sheets and am waiting for the next order to arrive.
  

Saturday, May 16, 2015

LAYOUT OVERVIEW

After receiving several requests for a photo or two of the entire layout, I thought I'd share this in the traditional MRR format.


November 2003: The Benchwork, of which there are 25 sections, was built by RailDreams out of Wisconsin. They laid 95% of the track and wired the layout with the DCC system.


Size: 21’ x 35’      Height: 48”

Prototype: Western & Atlantic RR, Atlanta GA to Chattanooga TN

Era: 1863, August

Style: Walk-around; point-to-point

Benchwork:  1.5” pink insulation foam board over ¼” Luan

Track: code 83 Flextrack

Mainline: 130’

Minimum radius: 18”

Minimum turnout: no. 4; Shinohara; stubs by BK Enterprises hand laid

Scenery: Plaster, Sculptamold over plaster cloth or cardboard strips. Ground cover – GA red dirt… yes, from GA

Backdrop: painted ¼” Masonite

Switch machines: Tortoise

System: NCE DCC tethered and wireless

Structures: BTS, Railway Design Associates, DPM, Bar Mills, Main Street Heritage, Branchline Trains. 36 are scratch built from photos and illustrations.

Figures: Musket Miniatures, Prieser, Airfix, Thomas, Merten, Model Power, Life-Like

First off, the reason for calling this the 'North Branch' is that fellow modeler and contributor, LeBron Mathews, also models the W&A… in Georgia. Hence we refer to his layout as the  ‘South Branch’. 

Additional contributors include:  
  • DC Cebula (MANY, MANY scratch built structures, bench work modifications, scenery)
  • Christopher Eldridge (Lee & Gordon’s Mill, Barnsley Gardens, blockhouse)
  • Brian Kammerer (backdrops) 
  • Andy Salcius (trees, structures, videos and fascia skirt)
  • Chris Comport (structures) 
  • Brent Pearson and Pete Culos (figures)
  • Garden State Central Model RR Club, in particular Jim Judge, (track work and electrical) 
  • Ku’uipo L. Radice (trees and crew vittles)
TRACK PLAN
Here is my design after about 30 iterations back in 2003. Last month Bernie Kempinski took this plan, which was done in pencil, and using a graphic software drew up the table top with track. 


Below Bernie did a beautiful job adding scenic contours, towns, etc. which gives the viewer a more complete sense of the floor plan.

In the beginning... DC and I cut away two areas of the bench. The first photo below shows the original Wye bench work as delivered and reconstructed by the folks from RailDreams. I contracted with them to complete the tables, install track and wire the entire layout. I knew relatively little then and thought this would speed up the process. It did. However, you know the story, knowing what I know now I... 
Here the reach was clearly too far and required change.
 
This next photo shows reach enhanced by trimming the bench and re-routing the track, all with the help of my good friend DC Cebula.
Track heading to the top of this photo is going south to Big Shanty and Atlanta. Track heading to bottom left goes north to Dalton and Chattanooga. Bottom right goes to Rome, GA. The Rome RR is one of six interchanges built into this layout including ET&G (East TN & GA), the M&C (Memphis and Charleston), N&C (Nashville & Chattanooga), A&WPt (Atlanta & West Pt.), GRR (Georgia RR) and M&W (Macon & Western). One plan is to build a gate to provide staging from Rome. We'll See!

Due to the selective compression requirements, you can get an idea on how we needed to alter the plan based on this diagram. This also shows the placement of locomotives during The Great Locomotive Chase. The General might very well have made it back to Union lines had it not been for the extra trains coming out of Chattanooga, marked here as the Second and Third Sections. Locomotive William R Smith did participate in the Chase until Bill Fuller met up with the Texas.


Two of my favorite people and contributors, DC and Lebron, April 12, 2007 conducting a test run.


Wednesday, May 13, 2015

Water Tank Detailing

DETAILS
We are near the end of the line, Chattanooga, regarding completing structures and basic scenicing. Although there is one nasty electrical issue haunting the Kingston area, we are switching to adding details to a moderately detailed model railroad. This includes everything from more figures and lighting to structural detailing and scenic elements at Kennesaw. We have also begun conversations for operations. My big to-do is adding more locos! More on locos and operations in the near future.
One obvious detail in waiting was a spout for a water tank built many years ago. Although a spout can be purchased I thought I'd try carving one from balsa as I wanted to get this project done asap.
Using the tank built by a very good scratch builder Chris Comport, http://chriscomport.com, as a reference, it was quite easy to fashion a spout. I took a block of scrap balsa and drew the spout profile. Making a few cuts to remove excess wood, it was then a matter of fine sanding, comparing, sanding and comparing, many times over until it looked about right.

Next was to build the spout's supporting frame which I also modeled from Chris' design. Although I combed the web for images and found some cool examples, this activity was after I began mimicking Chris' tank. I continue to remind myself of my impatience!! However, I wanted the spout configurations looking more similar than not for continuity. In the end it worked out reasonably well.
The one difference between Chris' model, foreground, and mine is that his is wood, the other is styrene. Originally I painted it grayish colors. It was my attempt to fashion weathered wood; and it looked just like that... an attempt. This photo shows it after it was scored and carved with a #11 and a wire brush. Mixing burnt sienna and tan colors, some yellow ochre and a touch of black brought it closure to this look which has a more wood-like appearance, to me at least. 
The weights and channels I believe are iron made; hence the colors chosen were intended to look like weathered iron. The 't' frame holding the channels appeared to be wood and were painted as such. All parts however are styrene. 

Here is the styrene tank with all her parts, ready to be assembled. Details West brass wire has been inserted into pre-drilled holes and glued with Loctite (a super glue). The wire attached to the weights will receive chain end links. The wire is small enough receive the tiny link which is then glued in place. Once dry the wire is trimmed down to the link. Same for the wire extending from the top beam. A link will be attached to it. I did this to ensure reasonable tension and a consistent look between the two, vs having the chain drooping... very untidy that way.
The spout also has a brass ring where the chain is attached from the weights. Wire is same size and simply wrapped once around the spout then twisted with needle nose leaving the tiniest end for the link.
The finished product...


Friday, April 17, 2015

GROWING TOBACCO

When considering your options for a layout a key ingredient, for me, is to have a plan or at least an idea of the different scenic elements to feature. 18th century tobacco was most associated with Virginia, North Carolina and Kentucky. Georgia was known for a variety of other crops. By the 1860's, in addition to cotton, wheat, corn and others, tobacco came into its own. 
Last week a tobacco field was added to the W&A, NB. After searching for a reasonably priced and yet good looking model I chose the Alkem plants. These are etched brass laser cut kits. 


Above you see one of the Alkem brass sheets with the laser and etched brass plants. There are enough pieces to make about 2 dz. plants. I use mostly three layers and some with four. The sheet was primed with an automotive spray paint then, as per instructions, a medium green on both sides. The top was then hit with a gloss coat to bring some life to the look. The brass rod protruding from the pink foam is the future stem. I decided to build them in this manner because the leaf layers will sit perpendicular once cemented with CA glue, about a pin head amount. 
I then slightly curl a few leaf ends with needle nose pliers for a little 'texture'. You can see that I left the stems about a half inch longer on top and about an inch on the other end to be able to handle. When complete, cut the stem above even with the plant and leave about 3/4" below. If installing in this type of foam, although the brass wire is 1.010, I use curve tipped tweezers; hold the bottom stem tip and wiggle the point into the foam. No glue required especially if you want to remove them. You can also make the field off-layout then insert the whole plot.
This is about half of the area where tobacco will be planted. Notice the tobacco shed in the background. That is a beautiful kit of the same name by BTS (better than scratch).