I have rebuilt about 10 of these Mantua Generals. But since Soundtraxx came out with the TS2 1100, I have converted a few to include these beauties. The sound varieties are are superior to their Economi and Micro sound decoders, which I had in several of my locos. Photo below is the General as Mantua manufactured it. I believe the former owner colored the stack and pilot as these were originally black, or if from a kit it would be bare metal. Note the drive shaft. This too was modified as I needed to change the motor to fit the tender along with a speaker, "super" capcitor and the sound decoder.
The most mindful aspect for a rebuild is determining what parts to paint while adding the electrical parts and the new details. Where to start?1?1?1 - Contemplate your sequence of moves. It is a bit of a chess match. And as with chess, there are multiple moves. For this build I first chose all the detail parts I wanted to add. Here are two photos showing these.
Top photo, row left to right: tender steps, water valves, water tank hatch, stack.
Bottom row left to right: tender brake beams, firewood split from local shrub, short and long handrail stanchions. Later I'll show how these were configured.
Top row, left to right: valve steam rocker arms, whistle, bell, horizontal pilot.
Bottom row left to right: boiler stanchions, steam chest lubricators, double link coupler pocket, long tool box for rear of tender.
Lastly, tender tool boxes that rest on tender top near cab, flag stanchions, pilot draw bar.
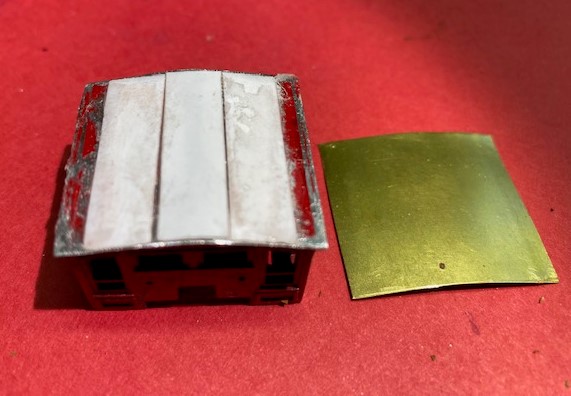
I made notes, both mental and written, as to what I wanted to build. First was the cab roof. Through our civil war railroads groups.io, we learned that cab roofs were not all peaked as with the Mantua model. There were arched as well. My good friend Lebron made one and I adapted his approach. First, file off the peak, then using a thin sheet of brass, it is shaped into an arch. Shims were inserted to support the new roof.
Now to assemble the electrical components. Most difficult to find these days is a strong motor that fits and can accommodate other parts. Here I have a Swiss Micron motor, 13mm x 20mm. The sound decoder, cube speaker and current keeper are by Soundtraxx. Respectfully TS2 1100, 810154 cube and 810140 "super capacitor". I also use TCS KA2 Keep Alives in some locos. Both of these have worked fabulously! Rarely is there a stall or stop over a switch. This next image shows the above components installed into the tender. The pointer is indicating the mini plug connecting the hot wire from the decoder to right side drivers. The ground wire is not visible but it's been attached to a screw that was tapped into the tender from. This connects the left side of the tender trucks which also have brass wire wipers soldered to the truck and bent slightly to touch the tender wheels on the left side. The white wire is connected to another mini plug for the hot wire coming from the headlamp.
Here you can see how the headlamp wires are connected. The ground wire is held in place with the screw that holds the steam dome in place. Duck tape keeps the wires secured to avoid floating into the drive mechanism.
Here you can see the electrical components, in particular the motor. These unfortunately have significantly increased in price, only available direct from Switzerland. At $90 plus a $16 shipping chang made these impractical to continue using. I am now on the hunt for a successor. Also in this photo you see a few other aspects of the install. One is how the ground wire from decoder is screwed into the tender frame. ANother is the mini plugs. You just cut away the black plastic with cutters. They are then soldered to their respective wire. Lastly is the use of scotch tape to hold it all together, seen also in a previous photo.
The painting of course started earlier. I primed with a Rustoleum paint. The Russia Iron color I found in my collection of Model Power paints. Russia Iron can be a variety of colors. However, this version, from my research, is pretty spot on.

The decals are by the master, John Ott. He is a medical illustrator by trade. He also creates remarkable lithographs of 19th century locomotives. http://www.ottgalleries.com
Here are the decals he recently did for me for this build. Impressive no?
I first cut the curved end. The other cuts being square are made after as the hold the decal in place for the free form cut of the curve.The area to apply decals must be painted white for the decals to show up. I use Vajello white. I tried the gloss white but it was too clumpy. ALthough you can see small ridges in the paint, these are unnoticeable after decal is applied. Micro Scale decal products are quite reliable.

Once applied, I wick most of the water away in some cases. right photo. But the water helps to loosen the decal to position it, left photo.
In some cases the decal is a little short. Color matching is ket to cover the white area at tender bottom. Two Polly S colors worked!
Main components are painted and ready to be assembled. Weight is a most important element for these locos. Cabs come with a full weight. However, I like to add the engineer. Using a very slow process of cutting out that corner with a hack saw allows for the figure.
This shows the drive shaft mechanism. You see two shafts. The longer one has NWSL parts because I wanted to narrow the ugly large shaft that comes with the General. I cut one of the large, white balls and drill a hole for the narrow piano wire.
Next time I will show installation of the other detail parts and other nuances to rebuild a Mantua 4-4-0.


.jpg)


