Showing posts with label Atlanta Rolling Mill. Show all posts

Tuesday, May 10, 2022

RPM CLINIC VALLEY FORGE PA, March 2022

March 26 I presented a clinic on my Atlanta / Schofield Rolling Mill to the Railroad Prototype Modelers convention in Valley Forge. By the time I realized I wanted a photo, the next clinician had his power point up. At least there is a modicum of proof I was there.

Looked like a terrific turnout. In addition to some outstanding clinics, there were about 6 venders with a variety of modeling products. Of course I found a few much-in-need-of items, like a current keeper, sugar cube speakers and detail parts.

If you'd like to see the clinic powerpoint presentation, it is uploaded to our site, civilwarrailroads.groups.io. 


Friday, February 25, 2022

Where Have I Been!?!

Since April I have embarked on a new journey; in addition, have been hosting bi-monthly zoom meets, fine tuning my locomotives and finishing off a new section of the layout with scenery.

As some of you may know of the NMRA, National Model Railroader's Association, they have a program called the Achievement Program. This is to encourage model railroaders' endeavors to develop  their skills, show their accomplishments and further the comradery with fellow modelers. 

The AP is a very structured and in-depth process. There are a total of 11 categories, 7 of which are required if you are working toward your Master Model Railroader (MMR) certificate. I started off with the category of Structures. To give you an idea, here is one form (the SOQ) to note the structures to be judged. 6 must be scratch built. The others can be kits, kitbashed or combination of all three, including scratch built.

 To date, I have four that made the cut: Roundhouse, Chattanooga Car Shed


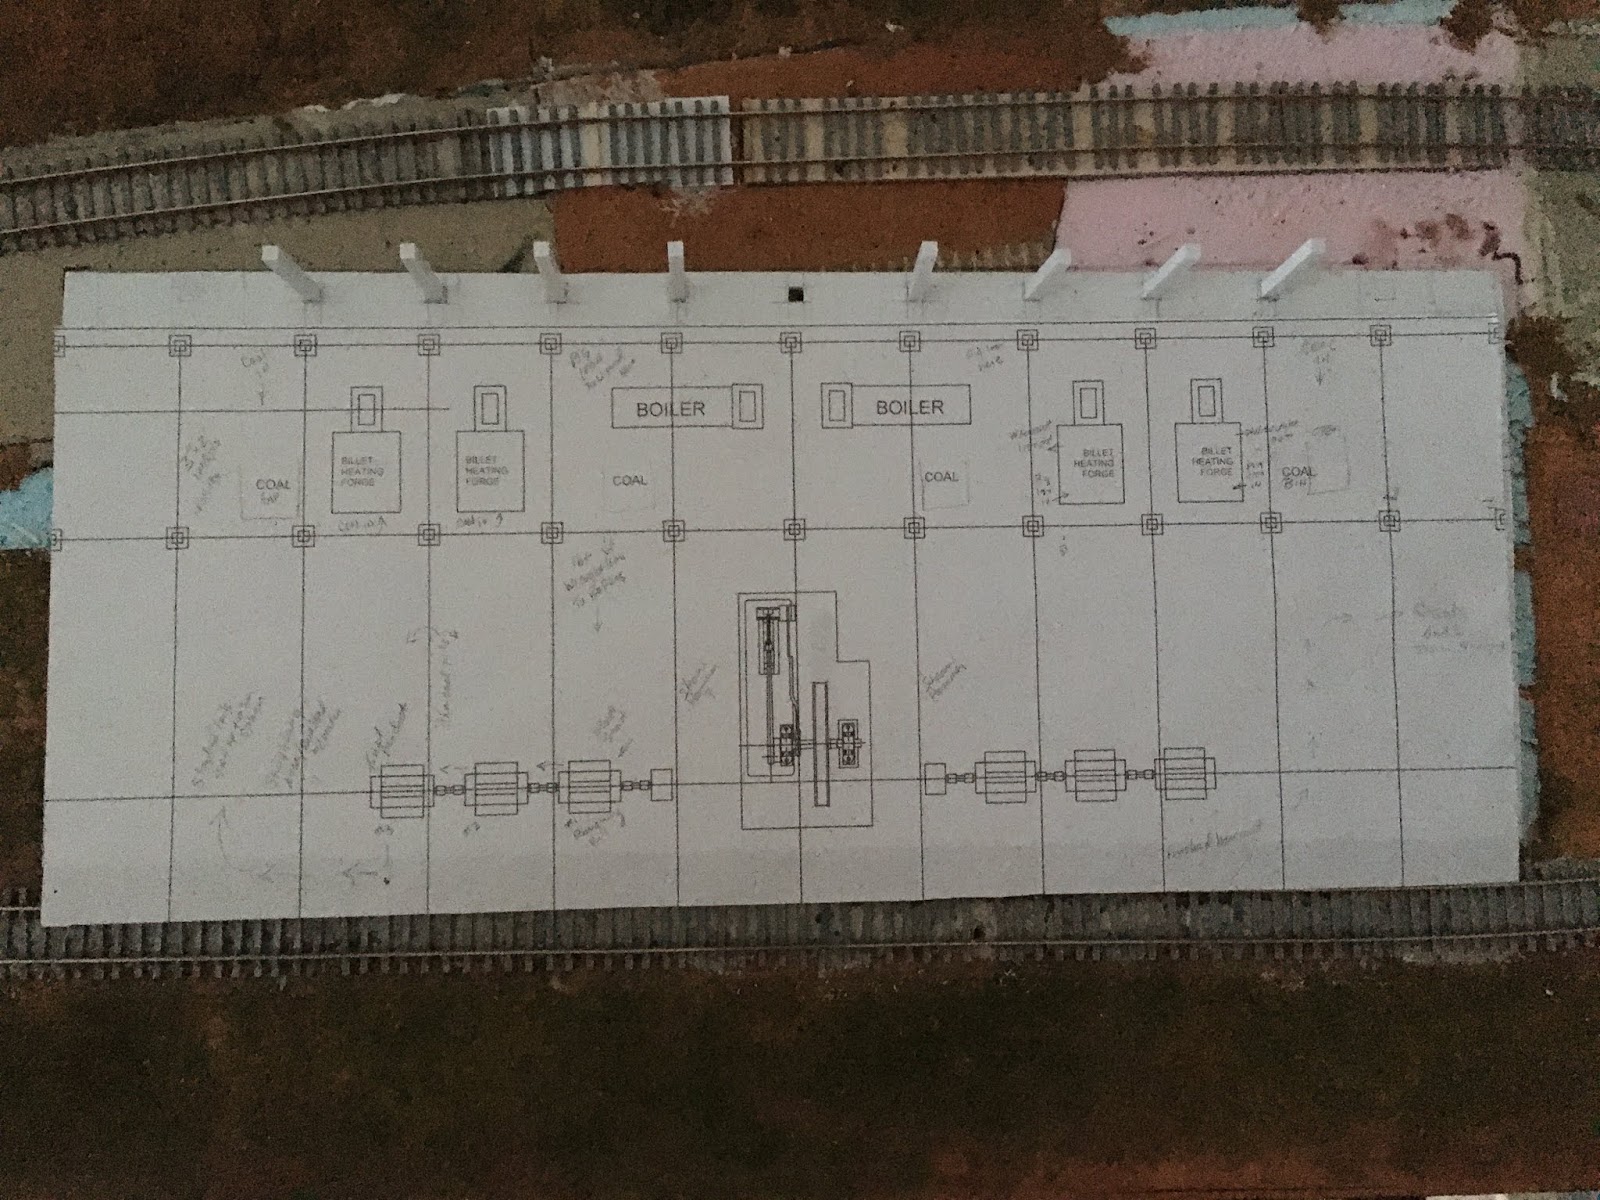
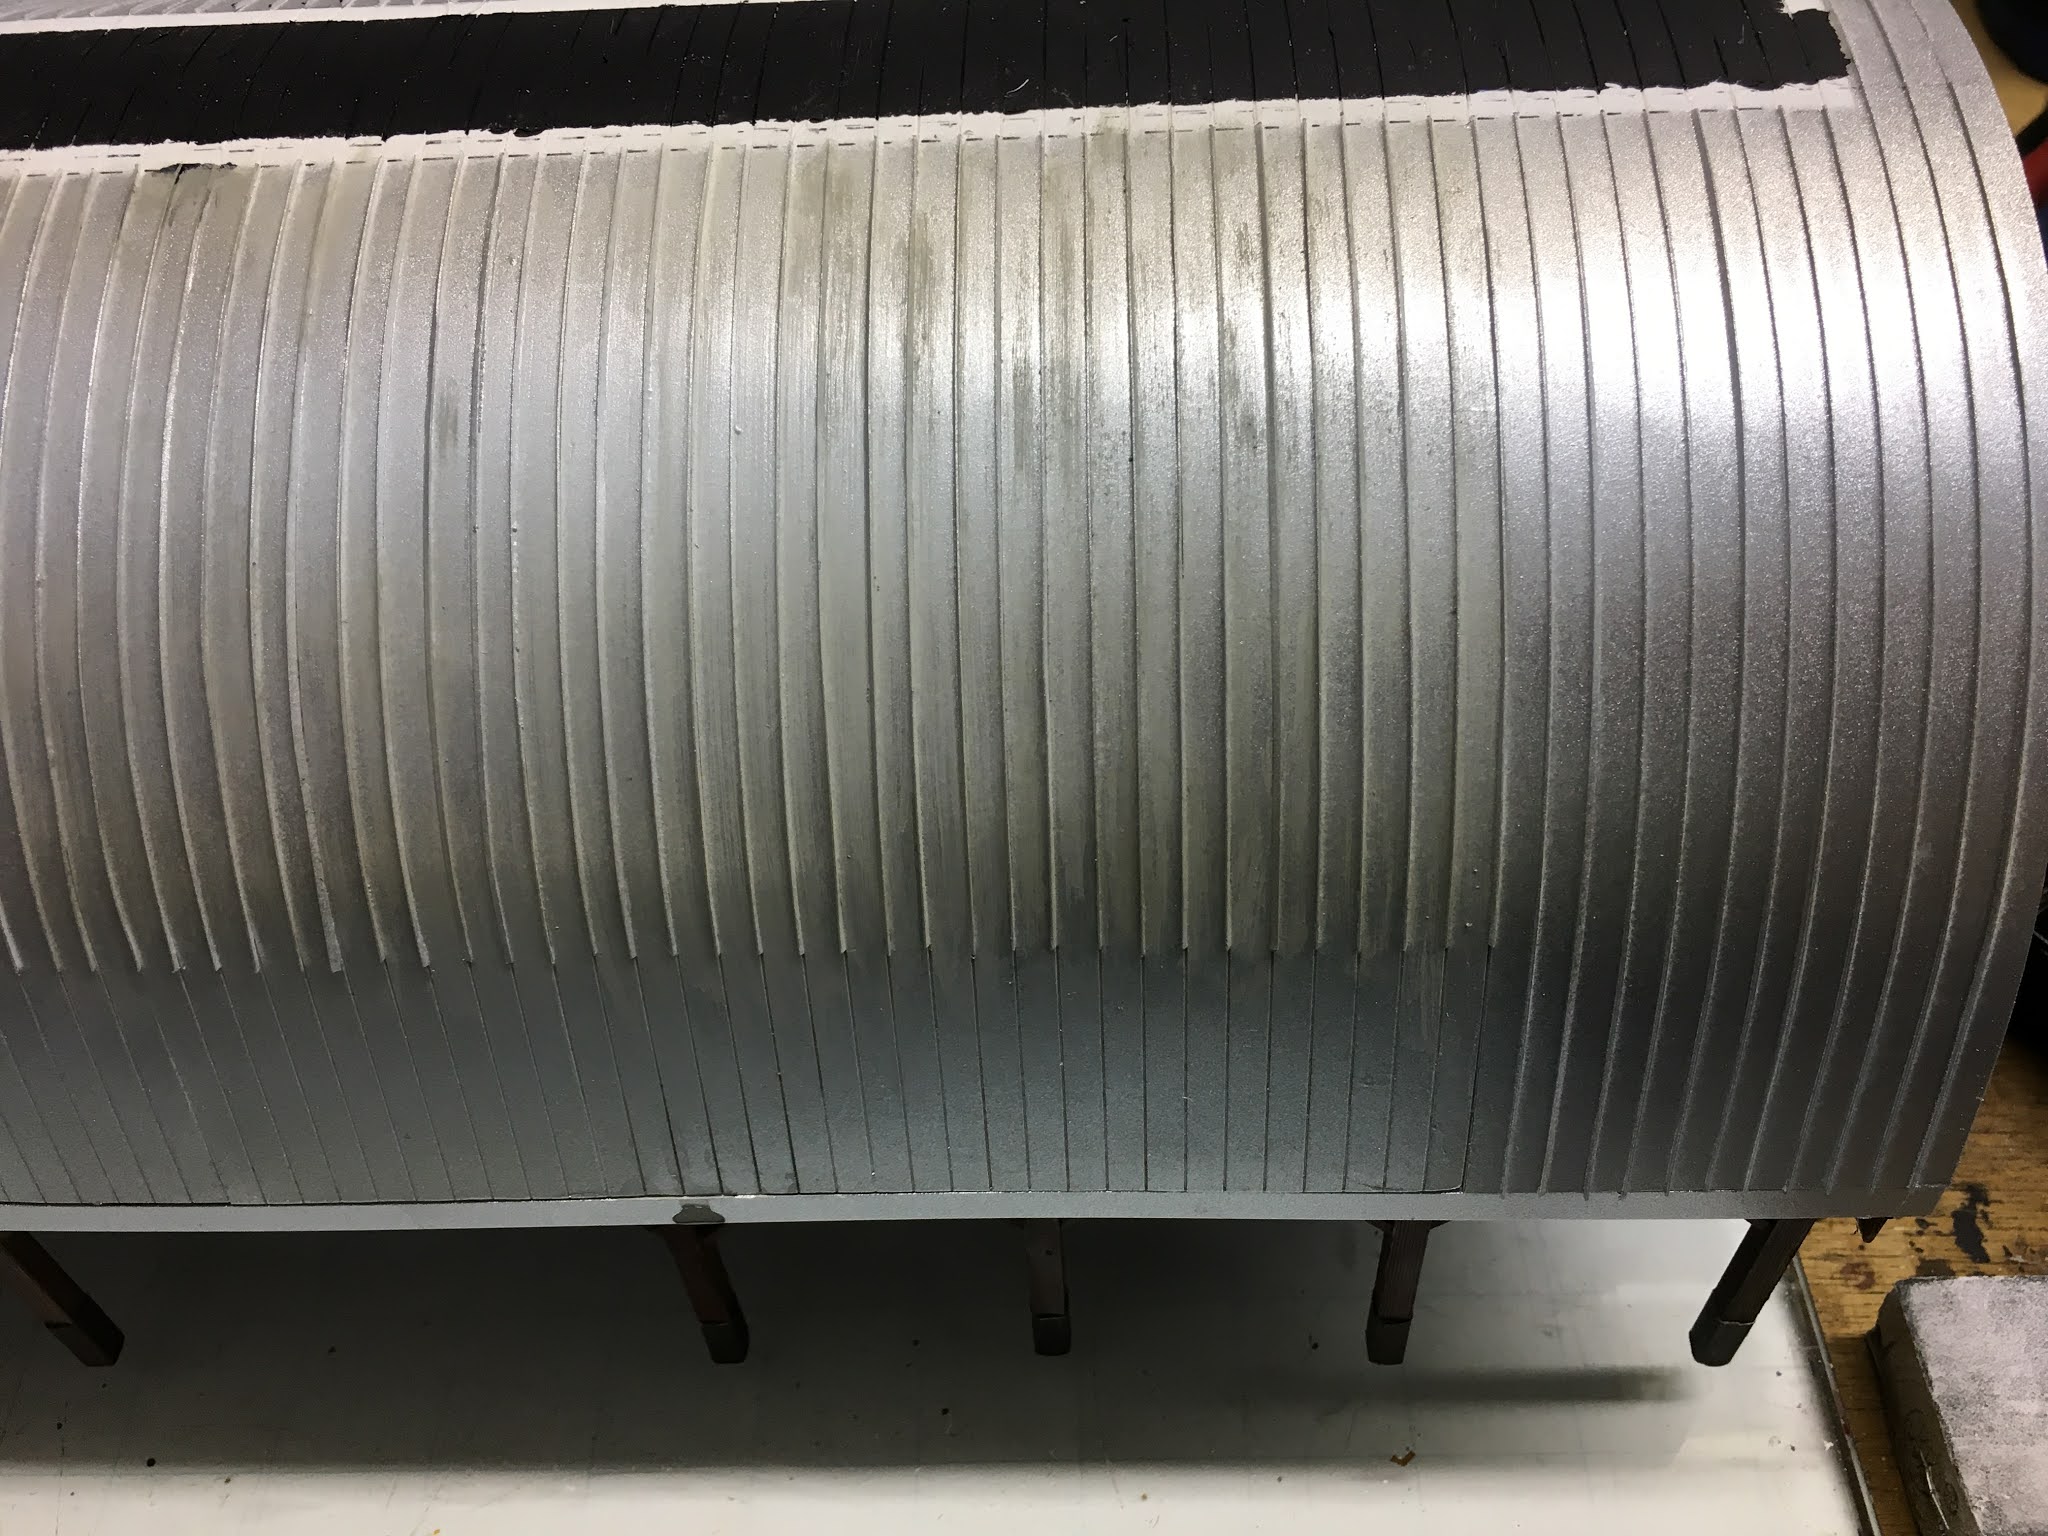
Schofield Rolling Mill and the Cotton Depot in Kingston

An MMR certificate, however, is not necessarily my goal. I have been learning so much from other modelers to fine tune my skills along with the fun of our conversations and just hanging out with fellow enthusiasts.   
Here are the Mid Eastern Region Division members assessing the Cotton Depot in Kingston... Left to right, Glyn, a MMR, Mike, on his way to MMR, Fred, also an MMR and a lead judge, and Jack. Glyn, Mike, and Jack are also being trained to judge. Next post will cover the new scenery addition.


Wednesday, February 3, 2021

Latest Images of the Atlanta Rolling Mill

Amazing in that five months have passed, I have had the least amount of work and NO POSTS! I decided to at the least share a few photos of the current state of the mill. 

The primary source for the interior detailing comes from this painting by Menzel:

One of the first interior elements were 3D printed by my good friend, and ACWRR member, Gerry Dykstra. He fashioned rollers that are a visual feature for this model.

This is one of many images Gerry sent to me and was the basis for his 3D printed roles:

These are the results of his printer. I add the bracing, stanchions and drive shafts all from brass rod and tubing.


Another massive machine was the steam hammer. Here is another image, compliments to Gerry's research, that was the template for the model I scratch built.

After scrapping the first attempt, due to oversize measuring on my part, this is the final completed model. The horizontal and vertical rods are the truss rods that kept the walls together.

Constructing the Bow Trusses were a tedious process. Here are two photos...


Adding additional details including figures, this is it's current state...
If you look closely, I fabricated aprons on several workers tending the rollers. These were formed with very old toothpaste tubes that used to made from metal. Initially I was using these to create flags, about 40 years ago. 
I attached BTS tongs to figures that just happened to have their arms in the right position. Although I have altered figures arms, etc., I prefer to find figures that are close to or happen to have just the right position. These are a combination of Musket Miniatures, Prieser and Model Power. 


Saturday, August 29, 2020

SCHOFIELD ROLLING MILL - ATLANTA

Track-side industry was scarce, even rare in the 1850's and through most of the 1860's. Although there may have been more, I have not researched past 1865 being a stickler for this time period. However, when industries can be identified, especially if my intention is to simulate operations, I will find a way to position it. This became so with a mill just outside of Atlanta, the Schofield Rolling Mill. The photo below shows the remains of the mill taken by the photographer who accompanied Gen'l Sherman during the Atlanta Campaign, George Barnard, in 1864. The remains of a whole lot of rail cars plus a couple of locomotives also fill the scene. Atlanta was under siege and General Hood's Army of TN was in retreat. Abandoning Atlanta required abandoning the trains as well because Sherman's army cut off the rail lines. Consequently, the trains were  intentionally torched. The rail cars also just happened to be loaded with munitions! Hence, the mess. 
There are other images of similar rolling mills, however, this is the only photo of Schofield I could find. And as you can see, there are two tracks. Most likely, but uncertain, is that one track is a passing siding and the other a main. 
You may recall the scene in Gone With The Wind where Rhett is leading a carriage with Millie, her new born and Scarlet through the burning cars in the Atlanta rail yard. That was the a depiction of Confederate soldiers needing to burn the cars and inadvertently so went the mill. Matter of fact, Wilbur Kurtz, consultant to the movie, had the prop builders add a sign to one of the buildings that read MILL. You can see this on photo outtakes of the film.

A close proximity to how the Schofield mill looked is this illustration. The caption lists it as Atlanta-Rolling Mill-1871. Serious selective compression will be required. I am modeling the 1863 version which, with poetic license, compression was required. 
Apparently, production output of the mill included mostly rail and canon tubes. One interesting feature of the structure is that it was open along most walls. This makes sense given the hot summers down south and the need for ventilation. Further research, and help from my buddy Gerry Dykstra, surfaced images of how the interior may have looked. 
This following painting is by von-Menzel depicting a mill in Europe. Many conversations later I was able to confirm that the interior was built of wood beams. Gerry indicated that the floor most likely was iron sheets vs. brick or stone as they would have exploded like shrapnel if hot iron hit it. The vertical beams would most likely have  been wrapped with iron sheet as well about 4' from the floor up to protect against flame. 
This next painting is a mill in Toronto. A big difference here is the roof design. This looks to be an A-type. The Atlanta mill roof was curved, similar to those of the Car Sheds in Atlanta and Chattanooga. Bow trusses will be built to accommodate the mill's curved roof. As you can see, there are a plethora of possibilities to be considered for the interior.

To begin,  I had identified a spot for the mill. The layout expansion not only solidified this plan, it also allowed the inclusion of a passing siding and room for a very compressed model of the mill. This will be north of Atlanta. 


However, the real mill was adjacent to two tracks, the Georgia RR and the East Tennessee & Ga. RR. Location was actually west of Atlanta. The diagram below was done by an on-line friend, Zoe, who unfortunately passed away a few years ago. Her plan was to create a virtual W&A. Although not completed, her research was invaluable. The W&A roundhouse is left, northwest of downtown. The tracks along its left side headed south passed the mill.

Speaking with Gerry Dykstra, he sent me a drawing of the floor plan as he would imagine it, as there is no such drawing, at least in my research. Working off this period photo, Gerry was able to draft a floor plan including rollers, furnaces and other essential elements.

The roof will be 3/4 with the open end of course facing the aisle.
  

Nest step was to build a base. The majority of layout structures are removable. The same is planned for the mill. As I could not find a thick enough styrene, this is a laminate. Quick Grip is THE BEST!
Next was to add the iron plating Gerry mentioned. These were each 5'x7'. It took a few... The gear is from a Faller steam engine model, #180388.
Base done, next was needing to build the roof first because it has a steep curve. Similar to the card shed, the roof is built first then the bow trusses. To built roof a jig was required. The jig is thin sheet metal.
First layer of styrene is little more than paper thin. Roof texture, Evergreen Metal Roofing #4521, is the top layer. 'Bondene' is the adhesive which works GREAT with most styrene, vs. Testors which seems to work only with Evergreen. 

Several sections of the metal roofing were needed to complete the length. Once these were set, next was to add the seems. These metal roofs were made in sections. The material was a tin makeup. The seems represent the soldered sections.

As you can see, MANY of these little buggers were required. Once done I chose a silver metallic spray paint as a base color. Roof was then painted a heavy wash of gray craft paints.

You notice the area where seems stopped. This was to allow the back section of the structure to be attached. The sides were cut from the Dykstra template...


The oval areas were louvers. Once attached as the sides, the roof interior was next. A terrific web site, Textures.com, offers free images. I was luck enough to find wood that matched what we deduced for the ceiling. A key bit of research came from another friend, Charlie who did the Chattanooga Car Shed... O scale! Charlie had this done to full scale; it came out to about 4'. 


For my HO version, another good friend, Jimmy Judge, scaled the Textures.com image to HO. As you see, these were cut into strips as I needed to install the cross bracing first because these needed to be glued directly to the ceiling. The paper would have impeded the adhesion. 

The result was gratifying, especially after some gritty weathering.

Of course I did not recognize the need for corbels as this project was learn as you go. These were willed with my Dremel hitched to a vise and used as a lathe.

Roof completed, work on the lean-to section commenced.  

This roof would be where the chimneys from the furnaces and boilers protruded. The chimneys came out to be the featured element.

Using another Textures.com paper, each chimney required 8 pieces to achieve the look of the period photo.

After many conversations with different construction friends and Mr Dykstra, copper flashing was deduced.


Stay tuned. In another couple of weeks I will have completed adding the bow truss rods, boilers, furnaces, steam engine and steam hammer.