ALATOONA PASS - THE RIDGE
Although advances in this scene has occurred, as seen in the Alatoona Pass Label file, this first photo gives you an idea on our starting point.

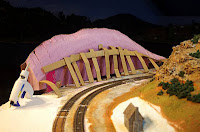
In these series of photos you can see the work that D.C. has begun.
 |
 |
 |
 |
Here, on the left, I am consulting with D.C. as to the ridge size. He took the photos. He then got to work cutting down the 1/4 inch Masonite with a jig saw, attached it to the fascia then added the foam board which he scribed prior to make the bend.
One of the unique aspects of the pass was the steepness. Approximately 80', this provided the perfect element given the narrow area that the mainline will travel. In these next two photos he attached cardboard support strips, compliments of Micro Mark, with the ease of gunned hot wax. This cardboard lattice will support sheets of plaster gauze.
The photo below shows he has added Sculptamold on top of the partially hardened plaster gauze. This is an excellent paper mache material with texture and, as seen here, has been carved. D.C. has added the rock outcropping definition and spray painted the gray as a base before final painting and weathering. He has also begun adding ground cover, dirt 'liberated' from the Alatoona Pass area. The stubs have been added as well and are ready to be wired.

Next time we hope to show you the final scene and perhaps a short video, with trains runnin!
Looking good. The pass was a highlight of the ACWRRHS trip tto Atlanta last Sept. I'm glad you could incorporate it in your layout.
ReplyDelete